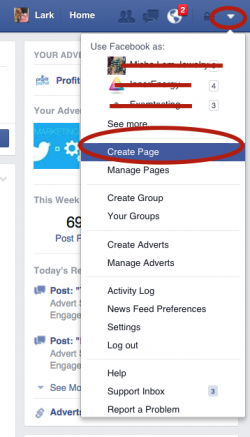
With just a few clicks, you can create a business/brand/organization page and start interacting with your target audience and generate sales.
-In order to create a business Facebook page, you will need to first login into your Facebook account. If you are not on Facebook yet, open an account.
1) Create the Business Page From Your Personal Profile
There are two steps involved in this operation:
2) Choose the Business Category for Your Page
The type of page you are going to create is going to depend on your niche, products and services.
- Local Business or Place
- Company, Organization or Institution
- Brand or Product
- Artist, Band or Public Figure
- Entertainment
- Cause or Community
Go with the category that suits your business best and then start with entering some basic information about your business. After you have completed this, you will have to Agree with the Facebook Pages Terms and then click Get Started.
3) Optimize Your Page and Begin to Grow Your Fans
As soon as you have established your Facebook business page, it is time to fill in some new information. For example, start by adding a description of your business, your website and local address.
Continue by adding a branded profile picture and a cover image.
If you want easier access when logging in you can add your page to Favorites on your Facebook account.
The Reach More People feature will allow you to reach new audiences. Once all this is ready, click Save Info.
4) Select Your CTA
A new feature that can also be customized on your page is the Call to Action button on the bottom left of your cover image. You can choose different CTA’s like Contact Us, Get More Info or Call Us. This button can help your viewers get more information about your business at the click of a button and it’s very important to have this part set up properly. Many pages still have not put these buttons into action and are missing out on potential new clients!
It is important to know that you are the administrator of your own page, so you are in control over what’s happening on your page (control and settings) through the Page Admin Tools.
If you want to add other administrator to the page, use the Manage your Page in Settings and invite them by typing in their email.
As mentioned before, the Page Admin Tools gives you control of your page, so you are the one controlling what gets shared with your fans and who can post to your page.
The Facebook Business Page Tools Offer You the Following:
- A space to put in all the important business contact information
- Notifications whenever customers are interacting with your page
- Measurements/insights, so you are able to see the performances of your page
- Control over everything, including who can view or manage the page
Monitoring Your Facebook Page Success
The Insights Tab will allow you to see the behaviors of your audience. With insights, you’ll be able to quickly see how many people have been giving you likes, how many of them have commented, how many have shared your posts, which posts receive the most reach and engagement, what your best times to post are and many other important factors about your audience that will help you grow your following.
If you need help creating, managing, or growing your Facebook following, send us an email; we’d love to help you out!
Now that you know how to create a Facebook page, here are some tips on what to post!


